Electron Engine ™
Printed Circuit Boards by Emissionlabs
EE20 Multi Purpose Board
 Please read introduction before clicking on Moving Coil or Audio
 - Moving Coil, Applications
- Moving Coil, Tuning
- Audio Board, Applications
- Audio Board, Tuning
Introduction EE20 Board
For use with LL1544, 1544A, 1545, 1545A, 1550, 1636, 1678, 1678XL, , 9206, 9226, 9226XL.
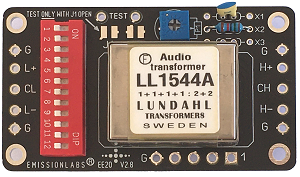 This series transformers has six coils. Allowing many applications, making this concept one of the best existing. For good reason these products are very popular with HiFi studios, private users, and OEM users.
But... these transformers are not intended for soldering wires directly on it. Though this is possible, and people do it, this causes sometimes the internal wiring becomes lose. Having to understand the necessary connections is difficult for users who only want to get the transformers working quickly. There is a also risk for grounding mistakes, and wiring errors. Often there is more than one way to connect everything, and the user begins of course with the most obvious. Once this works, nobody takes it apart any more, only to try another wiring. Finally, the only way to mount the transformer is by glueing it with the back side on the chassis.
All these issues are solved with the EE20 board.
In addition, this board offers several NEW connections schemes, which are not in the data sheet. No obligation to use it, but feel free to try, just by setting the piano switch. We list those additional schemes in the selection tables, together with the classic data sheet schemes.
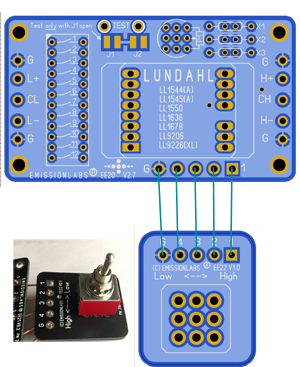
The EE20 Board, can be used stand alone, or without the external switch board EE22, which can also be attached at a later time.
Using the external switch board EE22, all options stay working, but now the gain can be changed by a factor 2, with the external switch.
All these applications are selected with the Piano switch, just select the settings from the table, and it works immediately.
Note, with a PHASE SPLITTER Application, the external Switch Board EE22 can not be used.
EE20 Board dimensions
- Outside dimensions 70 x 46mm.
- Mounting holes 3.5mm. Hole distance 62.2mm x 38.1mm.
- Vertical space needed: Depending on transformer: appr 28mm
EE22 Switch Board dimensions
This board needs no attachment screws. It is mounted only on the switch
- PCB: 30 x 35mm
- Drill hole for switch: 6mm
Gain + tuning Options
It is recommended to make the initial configuration without tuning. So no external components, no measurement is needed. It will work, same as the data sheet. If you want, in addition you can do some tuning, but wait with that until the end. With the Piano switch, all applications can be selected quickly, and the best sounding gain or impedance can be found, without risk on problems or mistakes.
Mounting hint
For stereo you could stack two of them on each other with longer space holders.
Grounding
The ground plane of the PCB is double sided, and via the mounting screws connected to the chassis ground. It is recommended to use an additional wire for the chassis ground, soldered to one of the 'G' connections. The advantage of this: The board works normal, also if not attached to the chassis.
Tuning of the EE20 Board
Why is this sometimes needed?
 Please do not see Tuning as something difficult which E20 needs to work properly. Many data sheets do not recommend tuning, and probably that's what you should do. However you can still try it afterwards.
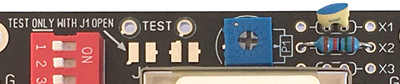
The tuning option can be activated by inserting the solder bridge J2. If tuning is not wanted, open the bridge J2 again, and you can leave the tuning parts in. The tuning becomes deactivated. However tuning is can be helpful for MC applications, when the needle jumps out of the groove at loud bass music pieces. For none MC, so only tone transformer applications, tuning may extend the linear frequency range up to 200kHz, depending on the transformer. If you are satisfied with a flat 20kHz, tuning is not needed. Yet, when you see on the oscilloscope, how a transformer works perfectly linear up to 200 kHz, by adding only a simple resistor, or a small RC combination, you would not want to leave it away probably. In case where Lundahl specifically recommends tuning parts, they can be added on the positions X1...X3 (See picture above).
For more info about tuning, check depending on what the application: Audio Board tuning, or Moving Coil tuning.