Tube exchange with Mastersound 300B-SE
First, let me say, this is no user's guide for how to do this. The Mastersound had always some small modifications, changes etc, and evaluated over the years. This is just about one particular version. You have to look inside always first, and see what you have. Though changes are small. For legal reasons, this page here, only describes only how I would do the tube exchange myself, and I do not advise here for DIY servicing.
This amplifier has a mix of fixed and variable bias. So to say, it is auto bias, but with a hand-adjustable "auto bias" point.
At switch on, there is a timer, which allows the tube heaters to warm up first. The grid voltage of the 300B is very negative now, this almost cuts off the tubes. Current is almost zero. Then, after the timer is activated, the bias voltage slowly moves to the pre-adjusted voltage, and the plate current increases slowly to the pre-adjusted value too. Additionally, there is a cathode resistor used, giving auto bias as well. The voltage over this resistor can be measured, which indicates the plate current.
You can replace the tubes by:
EML300B. Set Bias to 20V.
EML300B-Mesh, but set bias to 15V
EML300B-XLS. Set Bias to 20V.
EML320B-XLS or EML520B-V3 (Top Model tubes) Bias can be set higher, but 20V is fine also. If bias is set higher, this is hard to say what is possible still. Of course this not the official setting. This should be tried out, if it works nice. The tubes itself have no problem with 25V. This will allow higher output power. If you don't need higher output power, just use 20V.
LONG PROCEDURE:
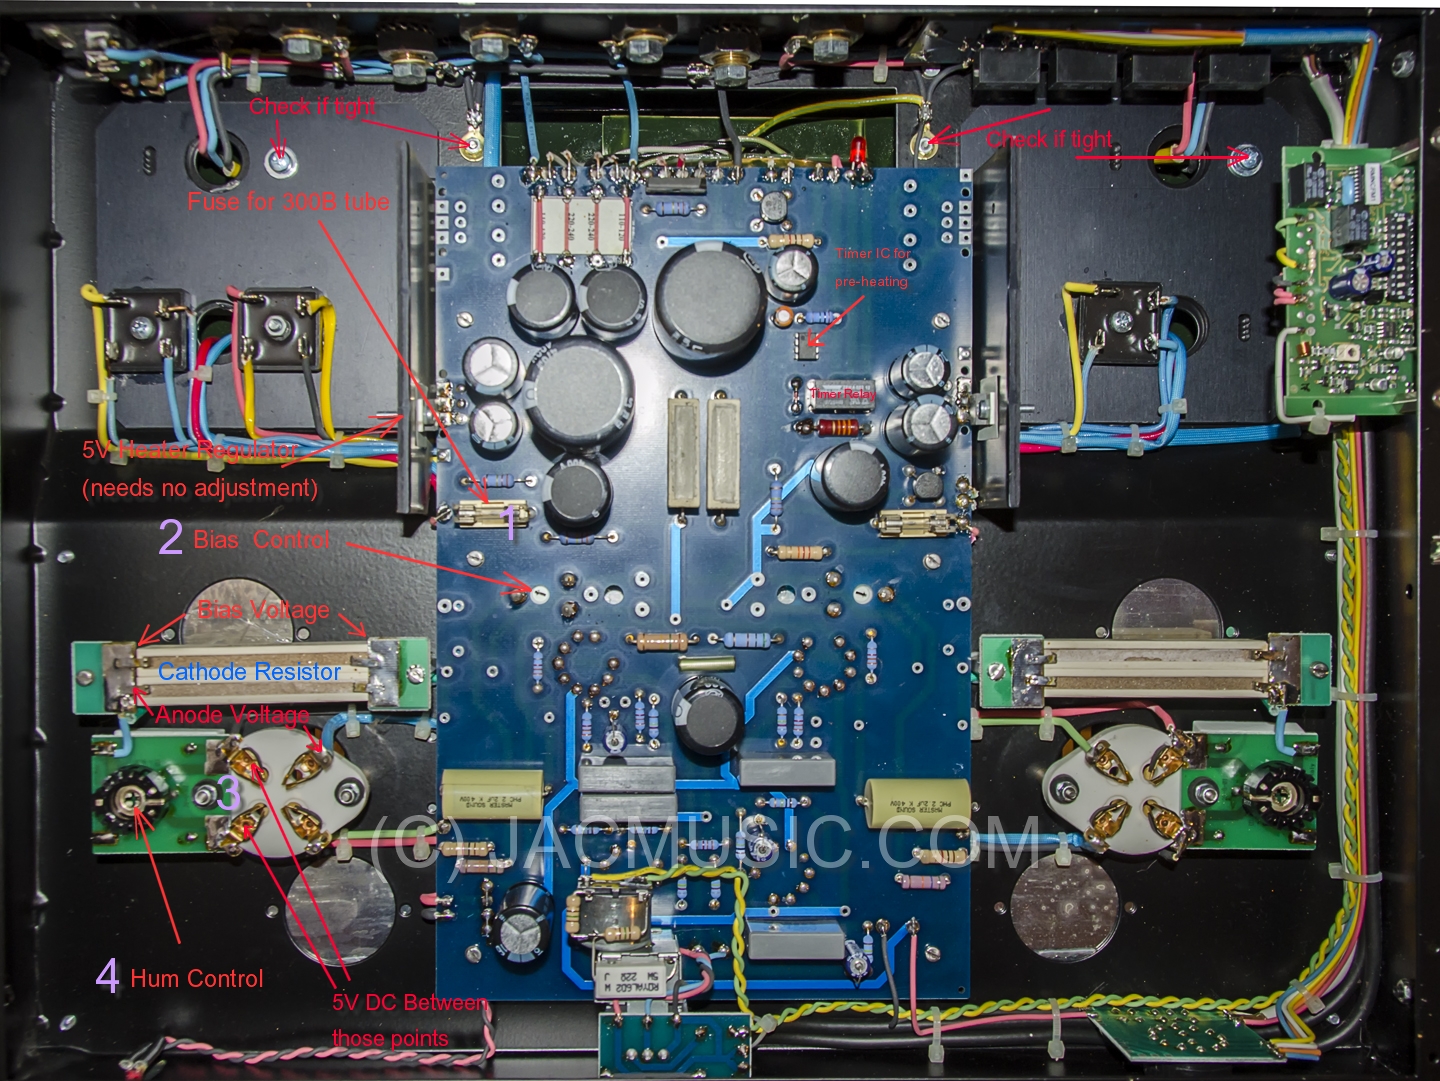
This refers to the pink numbers in the big picture below.:
-
If the amplifier stops working, perhaps the mains fuse is gone. Before I adjust the tubes, I SHORT CIRCUIT the 8 Ohms outputs, and the inputs as well. So there is no signal anywhere. Old tubes are still inside. Any defects or problems are fixed with the old tubes in. Check if the screws are tight. (See picture). With EML tubes, the amplifier can be operated on it's side, when it's resting on the LONG side. So not the short side, but with the round pieces of wood that is impossible anyway. Or, as I normally do, I put it fully upside down, using some styropor pieces, to place it on. The tubes can be used upside down.
-
Bias control setting. At the back of the amplifier are two small plugs. With the right type of connector, the bias voltage can be measured there. It should be 20V. First, this must be set to minimum, as we do not know what the new tubes will do. If I don't have the plugs, I measure directly over the cathode resistors.
-
With the bias at minimum, I now remove the old tubes, and put it the new ones. Now I measure if the heater voltage is 5.0V +/-2%. If the 5V is ok, adjust the bias to 20V, using the bias control (2). The bias needs to be checked continuously during the first half hour. Then, every half hour, then every two hours, then after 12 hours the final adjustment. I check it randomly the next 2 or 3 days, and then it is finished. Do not make fine-adjustments, as small changes will result from mains variations anyway. Any change lower than 1 Volt can be left as it is.
-
The anode voltage, in case I want to know, is measured between the tube socket and cathode resistor, but it needs no setting. When the amp is all done, and nicely working, the hum can be set to minimum, but this setting is usually more amplifier related as tube related. So once it is set nice, you probably won't find a better setting anyway. If you have no history, it may be, somebody changed it and set it not right. To set this, I remove the output short, but I leave in the input short. Then, I connect the speakers to the 8 Ohms, and additional a head-phone to the 16 Ohms. I listen to the hum, and set it at zero. There is this range, where hum is zero, and I set the pot meter in the middle of that.
SHORT PROCEDURE:
Only when I know this is right to do, like exchange for the same kind of tubes.
- Leave applier closed, and normally working. Set volume to zero.
- Connect bias meter from behind.
- Set bias to minimum, switch off amplifier Exchange tubes
- Set bias to 20V. Control same as in long procedure.
DRIVER Tubes ( 5687 and 6189W)
Roughly you can say, they need to be replaced half as often as the output tubes. If you don't know how old they are, it's better to replace them, as these are not very expensive.
|